Planning your first big event is exciting — and maybe a little overwhelming. You’ve got the date, the location, the guest list… now you need the shirts! Custom shirts aren’t just swag; they’re wearable memories that build community, promote your cause, and make your event pop.
Whether you’re hosting a charity run, a family reunion, or your first pop-up market, this guide will walk you through the process of ordering custom shirts for your first event with confidence — and yes, have a little fun along the way.
Step 1: Know Your Purpose (and Your People)
Before you dive into shirt styles and ink colors, think about why you’re making them:
- Promotional: Will these shirts help spread the word about your brand or cause?
- Commemorative: Are they keepsakes for attendees?
- Fundraising: Will you sell them to raise money?
The purpose will guide everything else — from the design to the type of shirt you choose. And remember: your audience matters. A corporate conference might want sleek, minimal branding, while a St. Louis street festival calls for something bold and colorful.
Step 2: Choose the Right Shirt Style
Shirts come in more shapes and sizes than you might think:
- Basic Tees: Affordable and versatile for most events.
- Premium Tees: Softer fabrics and a better fit for merch you want people to wear again and again.
- Tanks & Long Sleeves: Seasonal options to suit your event’s weather.
- Specialty Cuts: Women’s cuts, kids’ sizes, and extended sizing to make sure everyone is included.
At Tiny Little Monster, we’ll help you pick the perfect style so your guests actually want to wear it long after the event.
Step 3: Create a Design That Pops
A great shirt design is the difference between “cool souvenir” and “never leaves the drawer.”
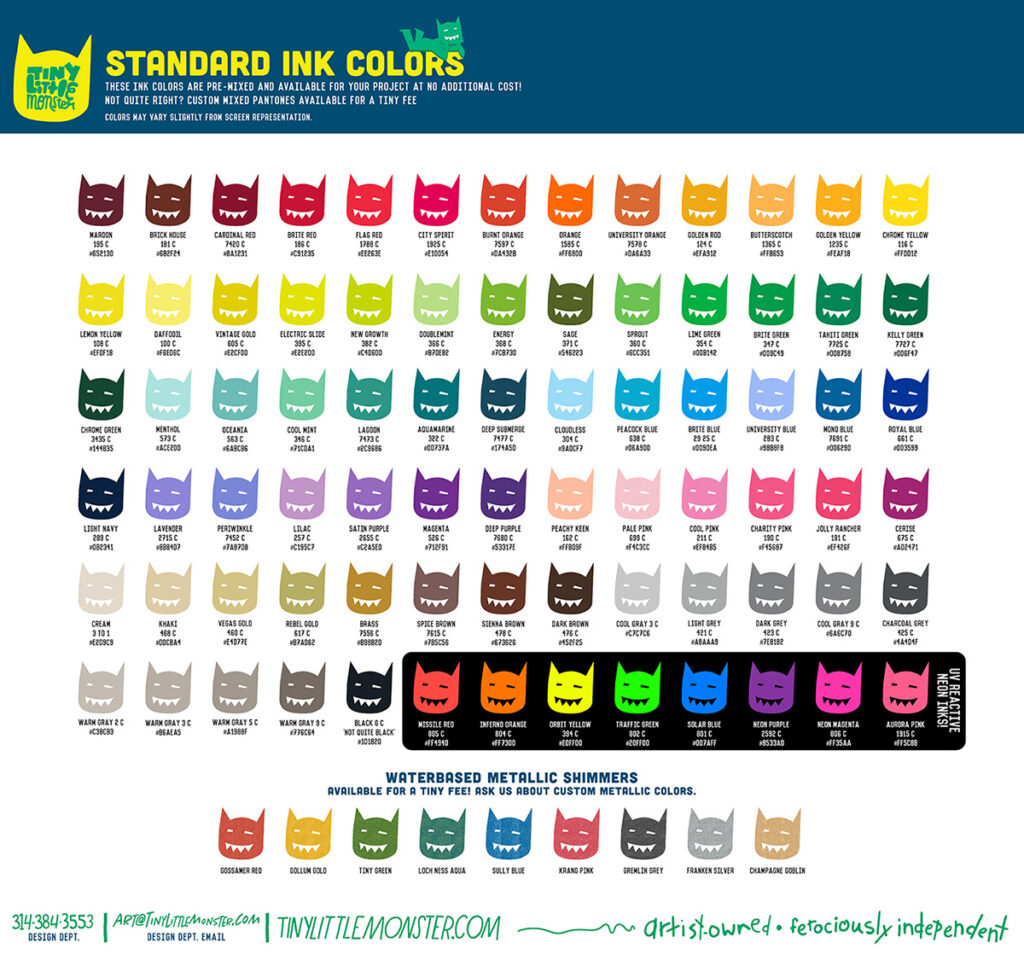
- Keep It Simple: Too many colors or details can get busy sometimes
- Use Bold Colors: Think of visibility in a crowd — we’re talking “Arch at sunset” golds or “Forest Park” greens.
- Include Event Details: Date, location, or a hashtag can make it feel special.
Pro Tip: Bring your ideas — even if it’s just a doodle — and our design team can turn it into something amazing.
Step 4: Plan Your Quantities & Sizes
Here’s the tricky part: how many shirts do you need and in what sizes?
- Start with Your Guest List: Plan one shirt per person, plus extras.
- Follow a Size Breakdown: Most events order more mediums and larges, but we’ll help you figure out your best mix.
- Order Early: Give yourself time for design tweaks and printing.
(Need help with sizes? Download our size breakdown sheet!)
Step 5: Work With a Local Print Shop (Like Us!)
Online ordering might seem easy, but here’s why local wins:
- Faster turnaround times — no waiting on shipping delays.
- Hands-on proofing — you can see a sample before we print the whole batch.
- Personal service — we’ll guide you through each step.
We’ve helped countless first-time event planners in St. Louis turn their ideas into wearable memories — and we can help you too.
Step 6: Add Some Fun to the Process
Ordering shirts should be exciting, not stressful. We believe in keeping the process lighthearted — from testing funky ink colors to swapping silly design ideas. Your event is a celebration, and your shirts should reflect that.
FAQs: Ordering Event Shirts for the First Time
Q: How far in advance should I order my shirts?
A: We recommend at least 3–4 weeks before your event to allow for design, proofing, and printing.
Q: Can I order a mix of styles?
A: Absolutely. We can combine short sleeves, long sleeves, tanks — whatever works for your crowd.
Q: What if I don’t have a final design?
A: Our in-house designers can help bring your idea to life, even if you’re starting from basic images and text.
Q: Is there a minimum order?
A: We can handle both small-batch and large-scale orders — no need to print hundreds if you only need a few.
Q: Can you match my brand colors?
A: Yes! We do custom color matching so your shirts fit your brand perfectly.
Ready to make your first event unforgettable?
Get a quote today and let’s make your custom shirts the star of the show.